Kia Carens: BCM (Body Control Module) / Repair procedures
Kia Carens RP (2013-2018) Service Manual / Body Electrical System / BCM (Body Control Module) / Repair procedures
| Removal |
| 1. |
Disconnect the negative (-) battery terminal.
|
| 2. |
Remove the glove box housing.
(Refer to Body - "Glove Box Housing")
|
| 3. |
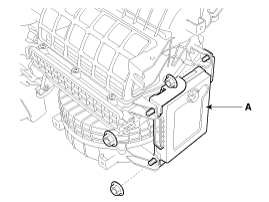
Disconnect the connectors (A) from the body control module.
[LHD]
[RHD]
|
| 4. |
Remove the body control module (A) after loosening the mounting nuts
and bolt.
[LHD]
[RHD]
|
| Installation |
| 1. |
Install the body control module.
|
| 2. |
Connect the body control module.
|
| 3. |
Install the glove box housing.
|
| BCM Diagnosis With GDS |
| 1. |
The body control module can diagnose by using the GDS more quickly.
The BCM communicates with the GDS and then reads the input/output value
and drives the actuator.
|
| 2. |
To diagnose the BCM function, select the menu of model and body control
module.
|
| 3. |
Select "Input/output monitoring", if you will check current data of
body network system. It provides input/output status of each module.
|
| 4. |
If you will check each module data operation forcefully, select "Actuation
test".
|
| 5. |
If you want to change user option, select “user option”.
|
 Description and operation
Description
Communication Network Diagram
Function
Function
Description
Input
Output
FRONT ...
 Seat Electrical
...
Other information:
Kia Carens RP (2013-2018) Service Manual: Repair procedures
Adjustment Inspect Glass Alignment 1. Inspect the alignment of the movable glass (C) that is between the front (A) and rear (B) glass and if needed adjust it. Alignment adjustment Standard value [mm(in.)] ...
Kia Carens RP (2013-2018) Service Manual: Rear Door Window Glass Repair procedures
Replacement 1. Remove the rear door trim. (Refer to Rear Door - "Rear Door Trim") 2. Remove the rear door belt inside weatherstrip (A). 3. Pull down rear door window glass by pre ...
Copyright © www.kicaman.com 2015-2025


